Time to throw out the tungsten lights?
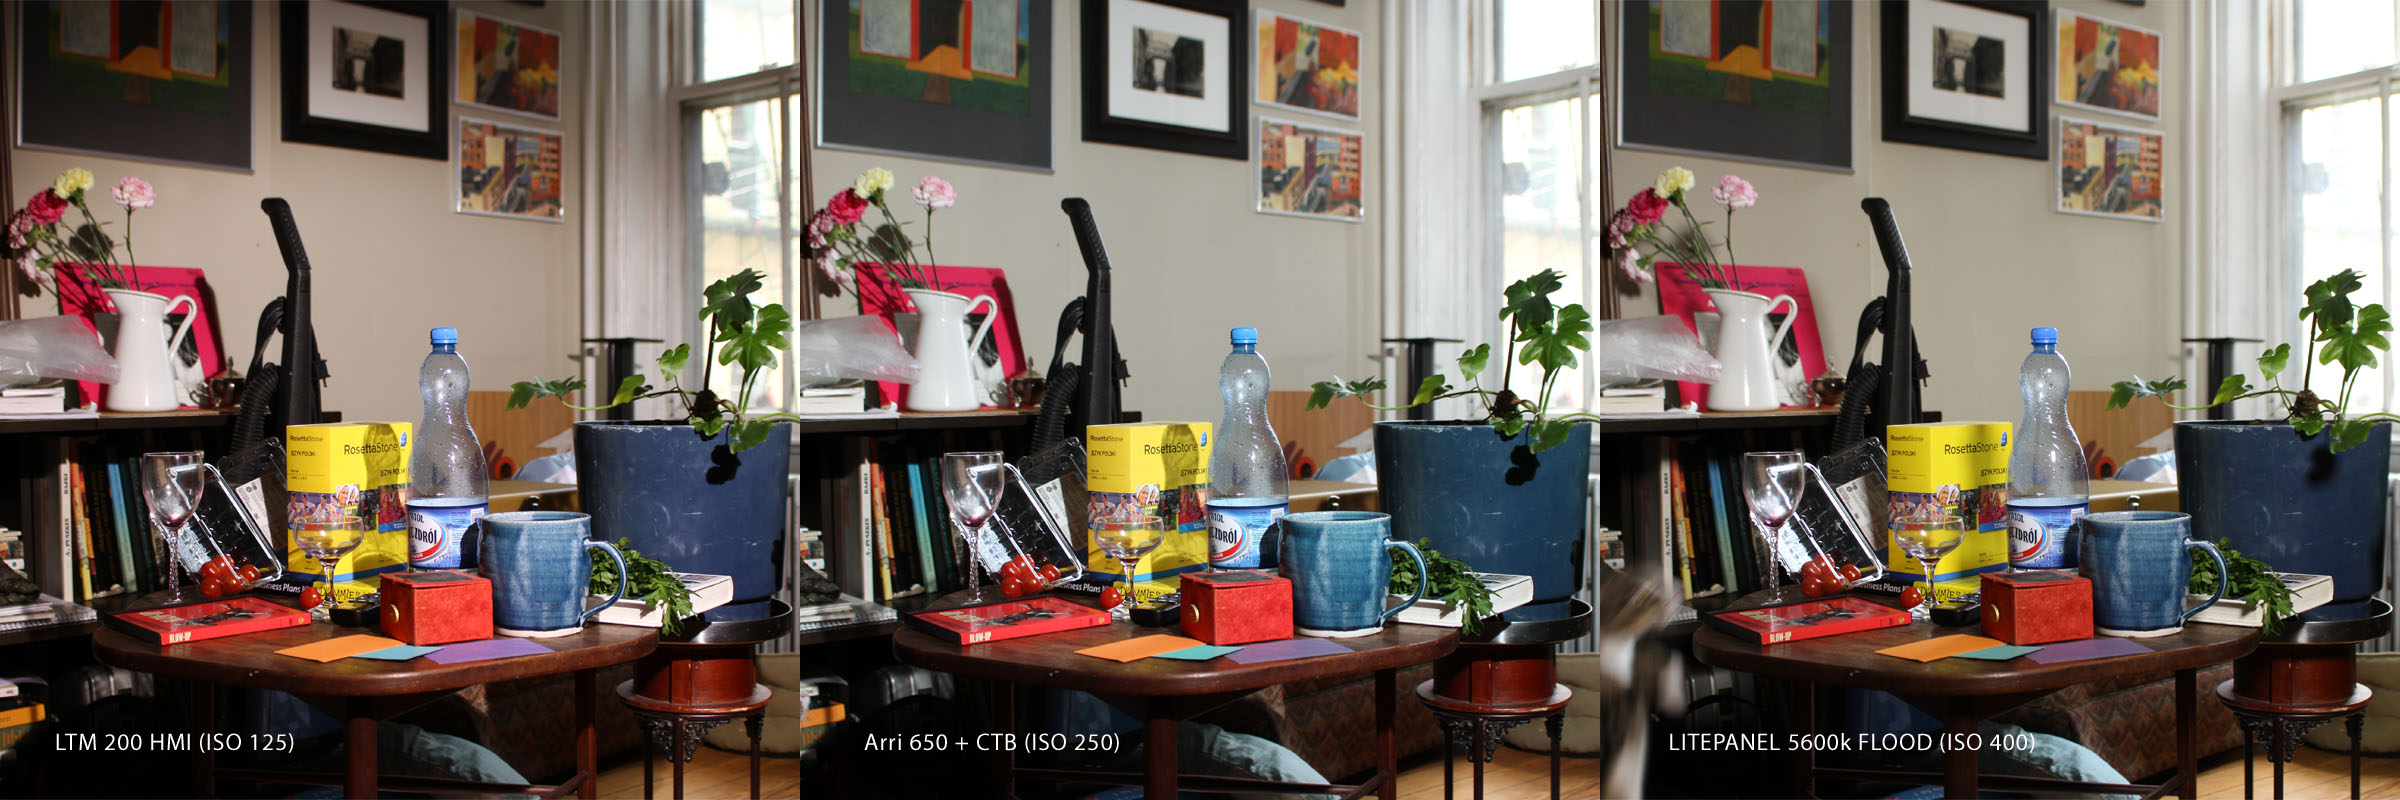
Recently i added a few LitePanle LEDs to my lighting kit so i wanted to learn a bit more about their properties (their color tint, how they respond to gels, how powerful they are). I set up 3 different lighting instruments: an HMI (LTM 200), a tungsten unit (Arri 650) and LED 1×1 (LitePanel 5600k Flood) unit and lit a scene. Now all those 3 lights are totally different instruments that have their strengths and weaknesses here they are being shown in very narrow test.

Camera used Canon 7D. All lights were placed 6 feel away from the table (for each picture each light was placed on the same stand). ISO was adjusted to provide more or less similar illumination from one light to another.
Here are 3 screen garbs with WB set to daylight (Arri gelled with CTB):
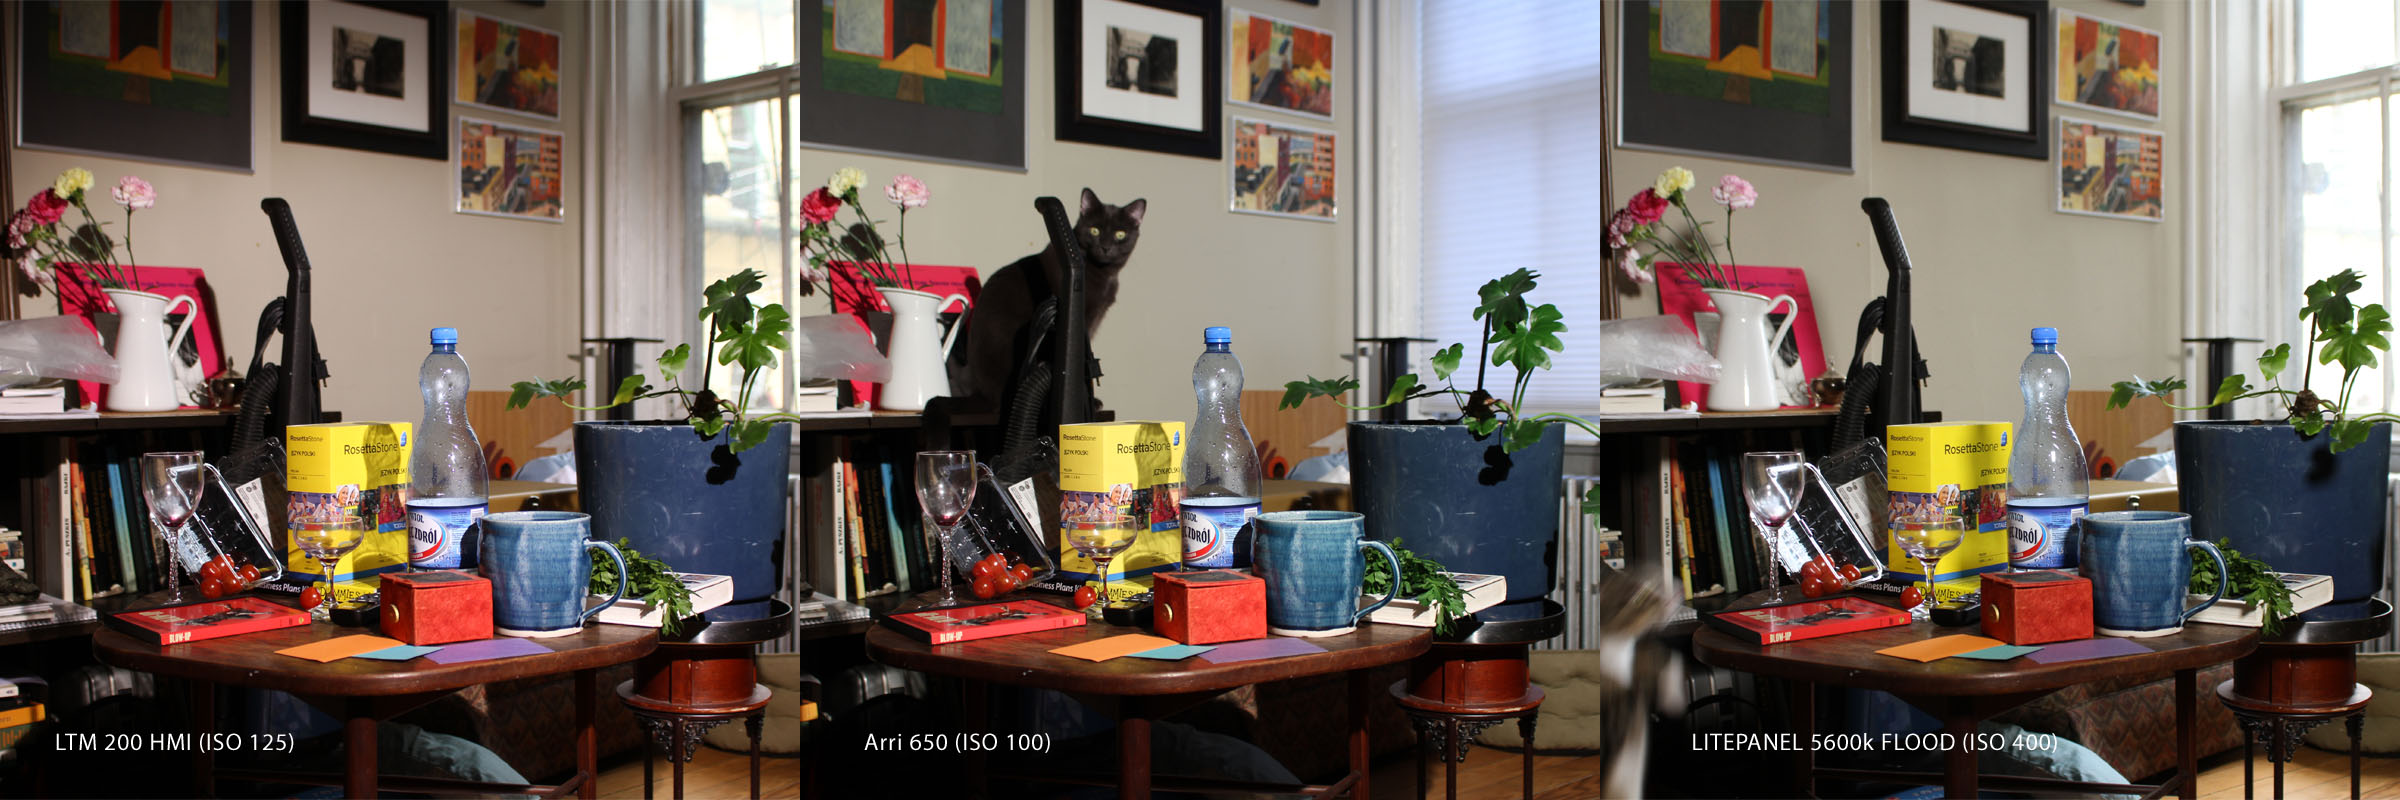
Here with WB set to tungsten:

And here to tungsten (HMI and LP gelled with CTO):

Conclusions:
– gelling any light other than tungsten produced unexpected results (some color shift)
– tungsten produces most natural colors
– LP in its native colors (here 5.6k) produces surprising good colors
– the bulb of this HMI is probably too fresh as it shows too much magenta (but i’m too lazy to redo the test with another HMI)
– when gelling lights it’s the fringes that show the most color distortions (see high res images below for better examples)
– 200 HMI is equivalent to 2x 650 with CTB !
– gelled, LP becomes almost unusable as 6 feet away from the subject the ISO has to be pushed to 1000!
– generally it’s best no to gel lights that are used as key to light your talent (unless going for an effect)
High res files to download:
http://tupeloproductions.com/gear/LP_test/
Here is the composite with best native white balance:
HMIs: buyer’s guide (used and new)
HMIs are very bright daylight balanced lights that are very efficient. In comparison to tungsten lights they provide about x3 as much brightness per watt consumed. Moreover you don’t have to gel the light to match with daylight which makes HMIs so much more attractive over thungsten lights sources.
The lighting unit is made-up of head, feeder cable (often called header cable) and ballast. Sometimes, in case of PAR lights, you also have lenses that help you modify the light pattern (and protect people from UV radiation).
When buying a light a number of factors need to be considered:
Bulbs
There are 3 kinds of bulbs. Sealed PAR64. Then Single Ended and Double Ended bulbs. Older lights accept PAR64 bulbs while newer lights accept either SE or DE bulbs. PAR64 goes for about $300/bulb while SE and DE bulbs go for about $130-160. Which obviously means that older lights might apear cheap at first but their cost will start adding up as the bulb is 2x as expensive. Many PAR64 lights can be converted to SE fixtures for about $400-500.
Ballast
There are magnetic ballasts and electronic ballast. More modern electronic ballasts have something called PFC (Power Factor Correction) which makes them more efficient and even better for use with generators.
Magnetic ballasts are “simple” but heavy (about 50-60lb for 1.2k ballast) moreover when they get old they start producing hum so it’s imperative to test out the ballast before purchasing (or ask right questions) as purchasing a used replacement ballast can cost you $300-500. That said many gaffers like mag ballasts as by being such ”simple” devices they work pretty much all the time.
Electronic ballast come in 2 versions. With fan or without (to cool down the electronics inside). The fan can get quite loud! If the ballast doesn’t have “silent” mode but just “24fps” mode it potentially means that you will always have to deal with the noise of the fan.
Connectors
You will find at least a few different connectors that allow connecting the head to the ballast. If you buy a package then it’s not a big deal as one assumes that all parts work with each other but when you buy replacement you need to know the connectors you are using, moreover if you are looking to build a package it’s a smart idea to stick with one type of connectors so that the cables and ballast stay interchangeable.
So in essence you should be asking potential seller following questions:
Is ballast mag or electronic? If mag then is it quiet? If electronic doe sit have “Silent” mode (again is it quite)?
Is the head PAR64, SE or DE?
Is the tread near the yolk worn out?
What connectors connect head to the ballast?
Brands of HMI lights (with is pluses and minuses):
Arri (125, 200, 400, 575, 1.2, 1.8)
+ Popular brand. 1.8 is the brightest light one can power-up with wall outlet.
– Large heads thus not so portable. Everything above 400 require junior receiver so you can’t mount the light on basic stands easily.
LTM (200, 575, 1.2)
+ Comparably small heads. Baby pin fits on all stands.
Desisti (200, 575, 1.2)
+ relatively inexpensive when bough used (probably because of their size those lights do net get much love)
– heads are HUGE
K5600 (200, 400, 800)
+ smales heads available
– new lights cost a small fortune, properitary bulbs cost fortune (about 2x as much as other lights of similar wattage)
Other brands I haven’t used:
Mole, Sunray, CMC, Strand, CoolLights, Kobolt
Variable ND filters (Genus Fader ND, Fader ND HD, Singh-Ray Vari ND) v. Tiffen NDs
When you need to cut down the amount of light coming in through the lens there is a number of available options. The traditional way is to put a high grade ND glass filter in the mattebox – this way worked for many many years but unfortunately is also the most time consuming as with changes of light intensity one needs to deal with handling fragile glass taking it in and out of mattebox. However there are other solutions – most of which suck… They all kind of work up to certain focal length beyond which they create fuzzy image. Of 3 variable ND filters i tested (Genus Fader ND, Fader ND HD, Singh-Ray Fader ND) only Singh-Ray retains sharpness of the image.
Anyway, I decided to run some test and include some images so everyone can judge for themselves (click the image for larger version):
Genus Fader ND v Tiffen NDs


Fader ND HD v Tiffen ND


Singh-Ray v Tiffen ND


Here are my conclusions:
Genus Fader ND – good design but bad pretty much anything else. The image falls apart on anything beyond 50mm, that said though originally i looked into variable ND filters for a project that was suppose to be shot all wide (35mm and wider) and for that this filter would work very well as 50mm and wider it is indeed sharp.
Fader ND HD – bad design – the front wheel is thin and smaller than the back wheel so you will find yourself fishing for the wheel. Optics are consistently OK but not really that spectacular on 50mm and wider (here Genus Fader is actually a bit sharper).
Singh-Ray Vari ND – good design – wheels are large so easy to grab the front wheel in run&gun situation. Optics are very impressive (at least considering the failures of the other two tested faders). There is though quite significant sift towards red in the image. That said though because of sharpness of the image this is the filter i’m keeping.
FlyKly – electric bike review
FlyKLy is a Chinese made electric bicycle sold (also supported and maintained) in NYC by a small start-up store in SoHo.
The bike looks great and handles well. Even though it’s a bicycle it looks like a scooter – which provides both benefits (lights, mirrors, blinkers – all for safety) and problems (because it looks like scooter people expect it to behave like one). This was my girlfriend’s and mine first venture into electricity powered vehicle so we really didn’t know what to expect – what convinced us to buy was my absolute hate for MTA and its corrupt ways as well as a need for some mobility freedom – oh, and of course, the bike looks cool.

Safety features… There is plenty. The bike has front and back light. The front light comes in 2 flavors: LED light so that others can see you at night and more powerful (thus more battery draining) bulb that you can light your way in the dark. Whenever you press brake (even if your lights are turned off) back red light lights up giving cars and vehicles behind you some warning. The bike comes with large blinkers in the front and the back so whenever you make a turn you can signal that to the traffic around you. It also comes equipped with two very useful mirrors (not pictured in the photos).
Bike is much lighter than traditional scooter/motorcycle so anti-theft prevention measures are important (so people simply don’t pick up your bike and walk away with it). Thankfully FlyKly is packed with those. You need key to operate the motor, the same key that lock and unlocks the turning of front wheel. Yet another (simpler) key locks the back wheel. The battery compartment containing very valuable battery ($600 based on FlyKLy’s website) is lockable too but for safety (and to recharge) I take it to my apt overnight. As extra precaution I also tend to chain the bike whenever I can.
Performance. FlyKly website claims that the bike can go 40 miles per charge but actual results are very different. Between me and my girlfriend we weight about 280lb and with this load and driving at medium speeds the battery lasts for 21 miles (24-25 if driven at its slowest speed – 20 mph or if driven at medium speed but with only the driver). The bike does get about 45 ODOMETER miles… Watching odometer you discover that the miles seem to be accumulating awfully quickly and indeed when you plot your route on google maps you will see that the actually driven distance is about half of what the odometer shows. The internal circuitry seems to be calculating miles drive based on the electricity output (as well as on many other factors) and if you look at the mileage at the beginning of the trip then you will know that you have about 45 odometer miles before the battery is dead. That way you can plan your trips accordingly. It seems with about 20 mile distance limit you will spend considerable amount of time plotting your route on google maps or even simply checking if you can get to your destination and back without running out of juice. …Because when you do run out of energy the fun stops. The bike doesn’t have any gears so pedaling this thing without the assistance of the motor is not fun. Though the pedals are not here only for the looks as they do come in handy. After a few trips you will realize that it’s sometimes best to relieve the motor (or rather the battery) from unnecessary strain so if you drive up the hill it does help to pedal a bit to allow the motor maintain its momentum (you don’t have to but that way you save yourself a bit of battery power).
It’s a pleasure to drive this thing. I never would have expected that a battery powered bike can get as much kick. It starts up fast (the other day I drag raced a guy on engine powered scooter and won – though when his scooter started picking up speed it started to take over my bike) and its speed is high – you can easily (though you kinda shouldn’t as legally this bike should max out at 20 mph) keep up with other cars in regular traffic. Then there is no noise pollution – you can barely hear the motor – the loudest part of the ride is the wind in your ears!
Craftsmanship. Because the bike is Chinese made (which the store owner isn’t hiding) you get all the “quality” we came to expect from Chinese craftsmanship when it comes to the parts finish: switches that feel a bit too flimsy, the knobs that you feel could use a bit more precise manufacturing, etc. – then again as it’s something that one can feel while test driving the bike I knew what to expect. Another point of initial dissatisfaction is how hard you have to press to lock the battery compartment/seat – it turns out that the locking mechanism lacked any kind of much needed lubrication and little bit of bike lube solved the problem.
Cool factor / how other see it. Riding this bike around town you will get many questions: what brand it is, how far can you go and how fast – unfortunately most of those questions come from, surprise, middle aged men. So if you thought that this bike will let you score with hot young girls of NYC… Well, I hope you have a back-up plan. Because the bike looks a bit like a scooter you will probably want to watch out and NOT behave like other bikes. Don’t run the red light and drive aginst the traffic and whenever you are in bike lanes on the bridges try to use the pedals along with the motor so you won’t make other bikes envious (and angry) while zipping past them while going up the hill.
Price. The bike goes for $1900 (taxes including) which at first might seem high -especially since you can find similar bikes online for about $1250 (with shipping) – yet apparently the other guys (based on the store’s info) use acid battery (which cost about $300) instead of Lithium-Ion (about $600) which gives this bike way longer battery longevity. Also FlyKly provides local tech support, the other day i got a flat tire and a tech came to change it the next day – all free of charge, while the other guys… well, they barely respond to your emails as I have found out. You start saving money pretty soon. Between me and my girlfriend it takes $10 to get somewhere and back on the subway, or, as I mentioned earlier due to my hate towards MTA, cabs and car service add up. A typical excursion can cost from $15 to $30 / day with 3-4 excursions per week you can average up savings of about $85/week or about $350/month.
Summary. Looks cool, has decent range and good speed. It is a bit pricey but over all i’m happy that we purchased one (I just wish that the range discrepancy wasn’t so huge).
Follow Focus battle – part 2
This is a follow up to an article I wrote about difficulty in finding a reliable follow focus that also doesn’t break your bank – in an essence – it doesn’t exits. Follow focus to work needs to be of very high quality which in turn makes it expensive.
One needs to ask what it takes to get a good focus. The answer obviously doesn’t start with the follow focus units but the lens. Distance focus ring has to travel from close to infinity is crucial. In most cases most modern lenses (especially zoom lenses) “suffer” from this distance being extremely short – often as short as 1/4 of the lens barrel revolution thus your subject moving from distance of, say, 4 to 6 feel will only need a tiny focus barrel move – difference often not significant enough for reliable focus pull. Here old lenses, prime lenses and cine lenses shine as those often require significant barrel move to focus from our example of 4 to 6 feet thus any error in mechanism of your FF unit (such as gear play) or error of the focus puller will be much less noticeable.
The question of the kind of lens gears attached to the lens is crucial too. There are many proposed solutions but it seems only the ones that have a constant diameter work. The flexible gears seem to change the pitch of the gears when flexed thus are not recommended as this introduces yet another possibility of error.
Assuming that we take care of the above – we find a good lens with good optics that has long traveling distance from close to infinity and we equip that lens with a good lens gear we can look at various FF units.
Here is how each column of the chart below represents FF’s behavior:
gear play – how much it takes from the marking wheel to move before the gear engaging the lens gear moves – obviously the lesser the better as with the gears not perfectly mashing against each other we start introducing errors that can have unforeseen effect on the sharpness of the footage
marking wheel size – originally the assumption was that the larger the marking wheel the more exact the markings are but this alone is not so. The reduction gears (if the FF unit has those) inside the gear box allow for the marking wheel to travel larger distances to achieve the focus – look at the marking wheel from Cinevate, Zacuto and Shoot 35, the Cinevate shows much smaller distance traveled on the wheel as opposed to Zacuto and shoot35. This can have both positive and negative implications, smaller distance might be a blessing on prime lenses while disadvantage on zoom lenses, while longer distance might have opposition effect. Moreover introduction of reduction gear might add unwanted gear play.

rods mount – or how sophisticated the mount is. In other words how many screws are necessary to make adjustments – for instance with Genus it takes 3 screws to make adjustment while in case of say Redrock it only takes 1. Some units were failed in this category because of plastic construction of the mount.
“sticks”category – when FF is mounted on the rods, then slid close to the lens, then tightened it tends to “stick” to the lens which in turn might add unforeseen forces to the lens that will influence ease of the focus pull. This category is a bit problematic as it’s really hard to measure properly.
movable maker – for all those out of ordinary focus pulls where marker in other then standard position is necessary.
small gear box – how much of a hustle the size of the gear box will be (especially while working with small prime lenses).
verdict column – this category is based on experience of shooting for living and seeing all the necessities that one might need in general set situations – in other words the final verdict is: does it do what it’s suppose to.
(click chart for larger version)

general notes:
Dfocus, Indifocus – it is what it is – some plastic parts put together that might teach you about the workings of a FF unit – don’t expect too much as the units don’t seem to have reduction gears, the gear play is quite large. Useless unless you are a student. Save your money and get a better unit that will last longer and actually work
Cavision, Redrick – those units actually kinda work if your don’t worry about having to repeat unsuccessful focus pull a few times – but if you are working where FF performance is essential (for instance working with actors) then there is too much error being introduced with gear play for rigors required from working set.
Genus – move your focus wheel then watch it slipping back by a millimeter or so… this unit only feels good in your hands and would probably make for a cool decorative piece but just doesn’t work (in class with Dfocus and Indifocus when it comes to its working quality)
Shoot35 – very impressed with the performance, based on the test I’m ordering one myself
Cinevate – near zero gear play (actually closer to NONE) but at the price of doing away with reduction gears. Large gear box is an issue but over all I’m happy owner of this unit.
Zacuto – work very well but surprisingly feels very cheap in your hands.
Arri – very good
Chrosiel – no opinion as I didn’t play with it long enough to form an opinion.
**********************
Things that were not looked at even though might influence your purchase (based on suggestions of other cameramen):
– can gear pitch be easily changed (are other gears available)?
– can gear be mounted on the other side of the FF arm? If so how easy is the transition?
– durability
– does it have ball bearings? what grease is used? (cheap one will freeze in cold)
– is marking wheel permanently attached and if not is there a notch on it to prevent it from sliding?
– is marking wheel easy to mark?
Follow focus and if you need one
See more complete part 2 here.
You even wondered why a chunk of metal with some gear box would cost $1k+? Here is why.
If anyone has experience shooting with DSLR, or shooting HDV (or any other highly compressed format) one wonders at the crispness of images coming out of those cameras. At the same time if anyone knows just little bit about mathematics one’s jaw drops when faced with impossible numbers of compression ratios that the footage coming out from those cameras has to go through to be recorded on the media. Still, numbers aside, visually the images look superb and one discovers that “good enough” is indeed good enough!
With similar philosophy one starts approaching other parts of the equation of making images. If one piece of the gear is good enough why should I spend big money to get expensive gear if there are plenty of options available for much smaller amount and if much cheaper cameras deliver satisfying image then potentially that peripheral gear shall do the same. Unfortunately that is not the case when it comes to follow focus units.
Good enough (meaning here cheap enough) is simply not adequate. Maybe it’s because it’s so much easier to judge the performance of the peripherals… The footage either is in focus or it’s not. You either hit the marks or you do not.
If you have a follow focus that is of poor quality, nine out of ten times, most likely you will get better result without using one.
Any assistant cameraman will tell you that a follow focus is an essential gear to achieve focus on the subject while the subject is moving in relations to the camera, but… Photo lenses working in the film world have a few properties that have no significance on them taking breathtaking sharp pictures but are not so great when dealing with films… Their focusing ring barely moves when going from say 6 feet to 4 feet (or any other distance for that matter) thus to pull the focus on such a move you will have to move the barrel of the lens by millimeters. Thus it should not be surprising that the quality of the follow focus has to be extra ordinary to allow any possibility of hitting the focus marks.
At first many are put off by the price tag of the pro follow focus units, after all it’s nothing but a 90 degree gear box with a focusing wheel on one end and the gear to turn the lens at another, but that simplified perception (and I must admit I was of that view at some point) quickly changes when one starts playing with various follow focus units in the field.
Truth is if you are using photo lenses none of the sub $1k units deliver. They simply do not allow one to hit the marks.
So if that is the case what makes the $1k + follow focuses so great?
Great follow focus has little gear play, meaning when the marking wheel is moved it engages the leans gear right away.
FF should have a large marking wheel to make the difference between millimeter focus pulls more apparent.
FF should not “stick”to the lens barrel when being tightened on the rods as it forces too much tension on the lens.
FF should have as few adjustments screws as possible to speed up the lens changes.
FF should have movable marker for those difficult camera placements.
And here is how most popular follow focus units stack up against each other (click for larger version):

DSLRs audio solutions
The quality of the audio comes from those basic items:
1. Placement of the mic (the closesr the mic is to the subject the better – thus you have boom operators who levitate the boom mic just inches above the frame line). As we are talking low budget productions, if you can’t afford the boom op, then placing a small mic (lavaliere) close to the mouth (on your subject chest) is second best soluton. Using the build in mic or even an external mic attached to the camera will result in mediocre results at best as the distance the sound waves have to travel from the subjects mouth to the mic is too great.
2. Mic quality. I use Sennhesier wireless units as my lavs and Rode NTG2 as my boom mic.
3. Preamp quality. The reason why plugging good, well placed mic directly to your camera still yields crappy audio (filled with circuity noise) is because of low quality pream electronics in your camera, thus you need a device with good preamps (external recorder, mixer, XLR adopter with preamps – all those will yield better results then plugin your mic directly into the camera).
I’ll review 3 devices that have a pre-amp and allow you to record better audio then the build in camera’s circuitry: Zoom H4, Zoom H4n, JuicedLink DN101 attached to CX211.
There is no one tool that is perfect for every situation, each has pluses and minuses.

Zoom H4
Pros:
— decent preamp
— lightweight
— allows to change the input level of each device separately
Cons:
— drifts up to 2 frames per 10 min of recording from the image of Canon 5D/7D
— no way to adjust the input level during recording
— clunky interface at first
— small display
— black & green display might be hard to read when your signal starts clipping
— clunky way to change batteries
Zoom H4n
Pros:
— momentarily flashing red light indicating clipping
— possibility to adjust the input levels during recording (equally on both inputs though)
— large display
— easy to comprehend interface
— lightweight
— easy was to change batteries
Cons:
— drifts up to 2 frames per 10 min of recording from the image of Canon 5D/7D
— doesn’t allows to change the input level of each device separately (WTF???)
JuicedLink DN101 (attached to JuicedLink CX211)
Pros:
— records straigh to the camera so you don’t have to sync up the audio in the post (also no drift issues)
— provides an audio monitoring ability through the headphones
— records one clean audio track
— you can adjust (ride) the levels of the input
Cons:
— the headphones level/quality is crap – you can monitor that you are getting the audio but not its quality (though it is mentioned in all the device’s literature)
— the meter only has 5 lights meaning you don’t exactly know how close you are to clipping (though the designer did put in a tiny red dot to show that your are clipping) – still hard to know whether you are feeding the camera good, juicy signal
— only one track of audio (though this is the only solution to disable Canon’s 7D AGC, thus it’s not really the device’s fault)
— the camera’s audio filter doesn’t allow for full volume to be recorded (again not really the device’s fault but something to conciser if you choose to go this route) – you will not be able to get to 0 dbs even if your sound sounds clipped
— weak cable from battery to device
— in playback the AGC track has to be disabled to hear the good audio – so no audio quality check on the fly
Canon 5D v 7D
I had access to Canon 5D (2.0.3) and 7D (1.0.9) so I decided to do some test. This test doesn’t have any images so in some places you simply have to take my word for it.
IMAGE
5D (full sensor size) – even though it has larger sensor I find it only marginally more light sensitive.
7D (1.6 crop sensor) – when set to lower contrast in picture styles the image looks exactly the same as 5D.
7D’s crop might not sound that significant but it does when you try to work with extreme lenses (such as wideangle lenses). My Tokina 11-16 even at 11mm on 7D wasn’t as wide as 16mm on 5D.
Both cameras show significant amount of artifacts when you record a wide vista with everything in focus.
5D, because of larger sensor, shows images that are a bit less noisy than 7D, but in real life applications when you run the image through very heavy h264 compression the difference is not noticeable.
FOCUS
5D – even with version 2.0.3 HDMI still outputs only SD signal thus you can’t focus using external monitor in record mode (no run&gun capability).
7D – HDMI outputs 720p (or something that looks like it) not uper sharp but definitley better then 5D and from my test using HDMI monitor totally acceptable for focus.
AUDIO
5D – manual audio, so you can get crisp audio using external pre-amp adapters such as JuicedLink
7D – auto audio… you get all the pluses and minuses of auto, plus because you have no manual control you can’t use external pre-amps thus you have to relay on in-camera circuitry = crap audio.
WINNERS (based on my experience of shooting those):
NARRATIVE (lots of visuals)
7D as it allows to focus with HDMI monitor
NARRATIVE (lots of dialogue)
5D as dialogue is usually static so with decent focus puller you can get sharp image and great audio (with 7D recording to external device is an option but there might be sound drifting issues).
MUSIC VIDEO
7D as it allows on the fly focus. Unless you do some very specific visually oriented work such as such extreme lens effects with fisheye as then the effect is more pronounced with 5D.
DOCS (general)
Neither: 7D allows on the fly focus but the audio is crap while 5D has crisp audio but so what if the shots might be potentially out of focus.
DOCS (sit down interviews)
5D as with sit down interviews there is usually very little focus shift and the audio you will get (if used with a pream such as JuicedLink) will be crisp.
DOCS (run and gun)
Neither, or potentially 7D as it allows to focus on the fly (with HDMI monitor), but the audio is OK at best.
COMMERCIALS
Either one as with commercials spots you usually get a focus puller to take care of the focus and the soundman that records to external device for sound back up anyway.
“Last Day of Summer” (a 12-day feature) – other locations
Here are the screen grabs from other locations. They are very small episodic locations, so usually relatively simple lighting set-ups.
Shipping Center. The whole scene was lit with a Kino and 2x 150w Dedos. we had plenty of available light in the location is it’s always a struggle of how minimalist you can get then right before the roll you get an idea to place just a tiny light here or there…


Camera Store. End of the night, every one on the crew was tires so no wonder all I did here is block out some available fluorescents, set up one 150w light and press the record button…


Hotel Lobby. Shot in the middle of the night. 1.2 HMI lighting the window blinds while another 1.2 HMI lights the light grid near the open door to over exposed the “daylight” outside. This is one of few times where I lit the character frontally and thanks to various patterns on the wall and his face I actually liked it.


“Last Day of Summer” (a 12-day feature) – fast food restaurant
In the film another important location plays a fast food restaurant where our hero (DJ Qualls) was once employed only to be bullied by his boss (William Saddler).
The restaurant was so well “cast” that it really didn’t need much art direction on our part and since almost each way we looked we saw a great shots it didn’t need much in terms of making it “look cool” lighting. That said though my time at the location was miserable as we had to shoot so many scenes there that I never felt we are getting decent enough coverage. Here too is where the 2 camera shoot came as a savior. Consider the scene below where the boss walks around the back room asking employees bunch of questions. We set up one camera on wide lens and another on medium lens and from the 2 camera positions were able to capture boss’ interactions with both the girl and the fat guy then with single camera capture the reverse cut aways.


and here is the lighting diagram of the above scene (the 4k HMI was already set for another scene so it wasn’t crucial but it did help) – click for larger version:

Office. In the boss’ office once again we were welcome with such wonderful location that we barely had to do anything to get a great shot.


and here is the lighting diagram of the above scene – click for larger version:

And a few other screen grabs:


leave a comment